
AC Blowing Warm Air? Here's What to Check"
Is your AC blowing warm air instead of cooling your home? Don’t panic. Many common issues are simple to identify and fix without calling a professional. Here’s what you should check first:
- Thermostat Settings: Ensure it’s set to “Cool” and the fan is on “Auto.” Replace batteries if needed.
- Air Filters: Dirty filters restrict airflow and can cause warm air. Replace them every 30–90 days.
- Outdoor Unit: Clear debris from the condenser and clean the coils.
- Circuit Breaker: Check for tripped breakers and reset once if necessary.
- Refrigerant Levels: Low refrigerant often requires professional attention.
If you’ve tried these steps and the problem persists, it may be time to contact an HVAC professional. Acting quickly can save you from bigger repair costs down the line.
AC Is Blowing Warm Air - Here's the Reason
sbb-itb-ab7d5a1
Check Your Thermostat Settings
Before jumping to conclusions about a major AC failure, take a moment to check your thermostat settings. Many issues with warm air can stem from simple mistakes that are easy to fix.
First, confirm that the mode selector is set to "Cool" rather than "Heat", "Off", or "Fan." On digital thermostats, this is usually displayed on the screen, while older models might have a physical switch. Then, adjust the temperature setting to about 5°F lower than the current room temperature. For instance, if your home is 78°F, set the thermostat to 73°F to activate the cooling cycle properly.
Pay attention to the fan setting, too. Make sure it’s set to "Auto" instead of "On." When set to "On", the fan will run continuously, even when the system isn’t actively cooling, which can result in room-temperature air circulating through your vents.
"If your thermostat is set to 'on' instead of 'auto,' the fan will run continuously, even when the system isn't cooling." - National Heating and Air Conditioning
If the thermostat display looks dim, blank, or behaves erratically, replace the batteries right away. Low batteries can interfere with the thermostat’s ability to communicate with your AC unit, stopping the cooling cycle from starting. A fresh set of batteries - usually costing between $5 and $15 - can often resolve the issue immediately. Additionally, for programmable thermostats, check if a pre-set schedule is overriding your settings, as this could cause unexpected warm air at specific times of the day.
Once you've confirmed the thermostat settings, the next step is to check your air filters to ensure proper airflow.
Inspect and Replace Air Filters
If your AC is blowing warm air, a clogged filter might be the culprit. When dust and debris build up on the filter, they block airflow, making it harder for your AC to remove heat effectively. This can result in warm or room-temperature air coming from your vents instead of the cool air you expect.
Signs Your Air Filter Needs Replacing
Keep an eye out for these signs that it’s time to switch out your filter:
- Weak airflow and rising energy bills could point to a clogged filter.
- Visible dust or dirt on the filter surface.
- Ice buildup on the indoor unit, which happens when restricted airflow causes the evaporator coils to freeze.
- Hold the filter up to a light source - if you can barely see light passing through, it’s time to replace it.
Steps to Replace an Air Filter
- Turn off the AC: Switch it off at the thermostat or breaker to ensure safety.
- Locate the filter: It’s usually found in the indoor air handler or inside the return ducts.
- Remove the old filter: Check the dimensions printed on the frame so you buy the correct size.
- Install the new filter: Standard filters range from $10 to $30. Place the new filter so the airflow arrow points toward the air handler.
- Turn the system back on: Once the new filter is in place, restore power to your AC.
Maintain a Regular Schedule
Make it a habit to check your filter monthly and replace it every 30 to 90 days, depending on your household. If you have pets, smokers, or allergy sufferers, aim for a 30-day replacement cycle. For homes without these factors, every 60 to 90 days should suffice. During summer, when your AC works overtime, inspecting the filter more frequently can help you avoid unexpected issues. After dealing with the air filter, the next step is to check your refrigerant levels for other potential problems.
Check Refrigerant Levels and Leaks
Refrigerant plays a key role in your AC's cooling process by absorbing heat from inside your home and releasing it outdoors. If refrigerant levels drop due to a leak, your system can't exchange heat effectively, leaving you with warm air blowing from the vents. Since refrigerant operates in a closed loop, it should last the lifetime of the unit. Any loss typically points to a leak or defect. After addressing thermostat settings and replacing air filters, checking refrigerant levels is the next step to ensure proper cooling.
Signs of Low Refrigerant
Here are some common indicators that your system might be running low on refrigerant:
- Warm or lukewarm air: Air from your vents may not feel cool enough.
- Ice or frost buildup: When refrigerant pressure drops, the evaporator coil or copper lines can fall below 32°F, causing moisture to freeze on the coils.
- Hissing or bubbling sounds: These noises often signal a refrigerant leak.
- Constant AC operation without reaching the set temperature and increased indoor humidity levels are also strong clues.
- In some cases, a noticeable chemical or sweet smell may accompany a significant leak.
Why Refrigerant Issues Require a Professional
If you notice any of these signs, it's essential to contact a professional instead of attempting to fix the issue yourself. Adding refrigerant is not only hazardous but also regulated by federal law. Only EPA-certified technicians are authorized to handle refrigerant or recharge AC systems, making DIY attempts both unsafe and illegal. Rene Langer, Senior Comfort Specialist at PICKHVAC, emphasizes:
"Refrigerant can be dangerous in the hands of a non-professional".
Direct exposure to refrigerant can result in chemical burns, frostbite, or inhalation risks like headaches, dizziness, or breathing issues. Certified technicians use specialized tools like manifold gauges, UV dye, and leak detectors to locate and repair leaks before recharging the system according to manufacturer guidelines.
If you suspect a leak, turn off your AC immediately to avoid damaging the compressor - a repair that could cost over $1,000. By comparison, a professional refrigerant recharge typically ranges from $150 to $450, making it a far more cost-effective solution.
Inspect the Outdoor Condenser Unit
Once you've checked the thermostat and filters, the next step is to inspect the outdoor condenser unit. This component is responsible for releasing heat from your home, and in most cases - around 90% - issues here are the reason your AC is blowing hot air. If debris or mechanical problems interfere with this process, your AC won't cool effectively. Keeping the condenser unit clean and free of obstructions is just as important as maintaining clean filters or proper refrigerant levels. Start by clearing away debris to ensure proper airflow.
Clear Debris from the Unit
First, examine the area around the condenser. Things like dry leaves, weeds, overgrown plants, and dirt can accumulate and block the airflow the unit requires. Always turn off the power at the service disconnect or circuit breaker panel before working on the unit or removing any panels. Clear a 2-to-3-foot radius around the unit, removing any vegetation or debris. Avoid placing items on top of the compressor, as this can block heat exhaust and strain the system.
For cleaning the coils, use a garden hose to gently rinse off dust and grime. Do not use a pressure washer, as the high pressure can damage the metal fins. Spray from the inside out to push debris away from the unit. If you live in a dusty or coastal area, make it a habit to rinse the outdoor coil every spring or whenever it appears dirty.
Check the Fan and Coils
While the power is still off, inspect the fan blades to ensure they spin freely and aren't blocked by debris like sticks or leaves. This step is essential for maintaining airflow. Also, examine the coils for bent fins or visible damage that could hinder performance. If you hear grinding noises, it could mean the fan motor bearings are worn out. Jeff Ault, Virtual HVAC Expert at Frontdoor, emphasizes:
"The best thing a homeowner can do is to keep their system clean with regular filter changes, rinsing the coils on outdoor units, and cleaning out the drain line with a shop vac".
Perform a Power Cycle
If the outdoor unit isn't running at all, try a power cycle to reset the system. Turn off the power at the breaker, press the reset button on the unit (if available) for a few seconds, and wait about 30 minutes before turning the power back on. This gives the system time to reset. However, if the circuit breaker trips again immediately after resetting, stop and call a professional. Repeated tripping signals an electrical fault that requires expert attention.
Check Electrical and Compressor Function
If you've already cleared debris and inspected the condenser but warm air is still coming from your AC, the issue might be electrical or related to the compressor. The compressor is responsible for pumping refrigerant to remove heat, so if it fails, the air won't cool. Interestingly, about 20% of compressor failures are linked to tripped breakers or blown fuses. After inspecting the condenser, it's crucial to check the electrical components.
Check Your Circuit Breaker
Start by inspecting your home's main electrical panel, which is usually found in the garage, basement, or a utility closet. Look for a switch labeled "AC" that might be in the "OFF" position or stuck. Ensure both the indoor and outdoor breakers are switched to "ON." Additionally, check the outdoor disconnect box near the condenser unit, as it may contain blown fuses.
If you discover a tripped breaker, follow the "one-reset" rule: reset it only once. First, turn off your thermostat and give the AC about five minutes to cool down. Then, flip the breaker fully to "OFF" and back to "ON." Wait 30 seconds before setting the thermostat to "Cool." If the breaker trips again immediately or shortly after, stop and call a professional. Advanced Air advises:
"If your AC immediately trips again, do NOT reset the breaker again until the cause is corrected. Multiple overcurrents, or surges of electricity, can damage your AC and even start a fire".
Always be cautious. Never stand in water while resetting a breaker, and if you notice burning smells or see scorch marks on the panel, contact a technician right away.
Look for Compressor Issues
Even if the AC has power, the compressor might not engage. One common problem involves failed capacitors, which account for 30% of compressor issues. If the compressor isn't starting, you might hear a humming noise from the outdoor unit. Other warning signs include chattering or buzzing sounds (often linked to contactor failure), grinding or screeching noises (indicating motor trouble), or the system rapidly turning on and off. If the outdoor fan is spinning but the compressor isn't producing its usual hum and the air remains warm, this could point to a capacitor or contactor issue.
On particularly hot days, the compressor's thermal overload protector might shut it down for safety. If this happens, give it some time to reset before trying again.
When to Call a Professional
Compressor and electrical repairs are best left to professionals due to safety concerns. For example, capacitor repairs involve handling live electrical components, which can be dangerous. Additionally, if low refrigerant levels have caused a safety shutdown, only a technician with EPA certification can address the issue. Professionals use tools like multimeters to accurately diagnose problems, reducing the risk of unnecessary and costly part replacements.
Call a technician if you notice unusual noises like buzzing, humming, grinding, or screeching, if the breaker trips repeatedly, or if the system short-cycles. While capacitor and contactor replacements are relatively affordable, actual compressor motor failures - though rare (about 2% of cases) - are the most expensive to fix. If your AC system is over 12 years old, replacing the entire unit might be more economical than repairing a failed compressor.
Troubleshooting Summary Table
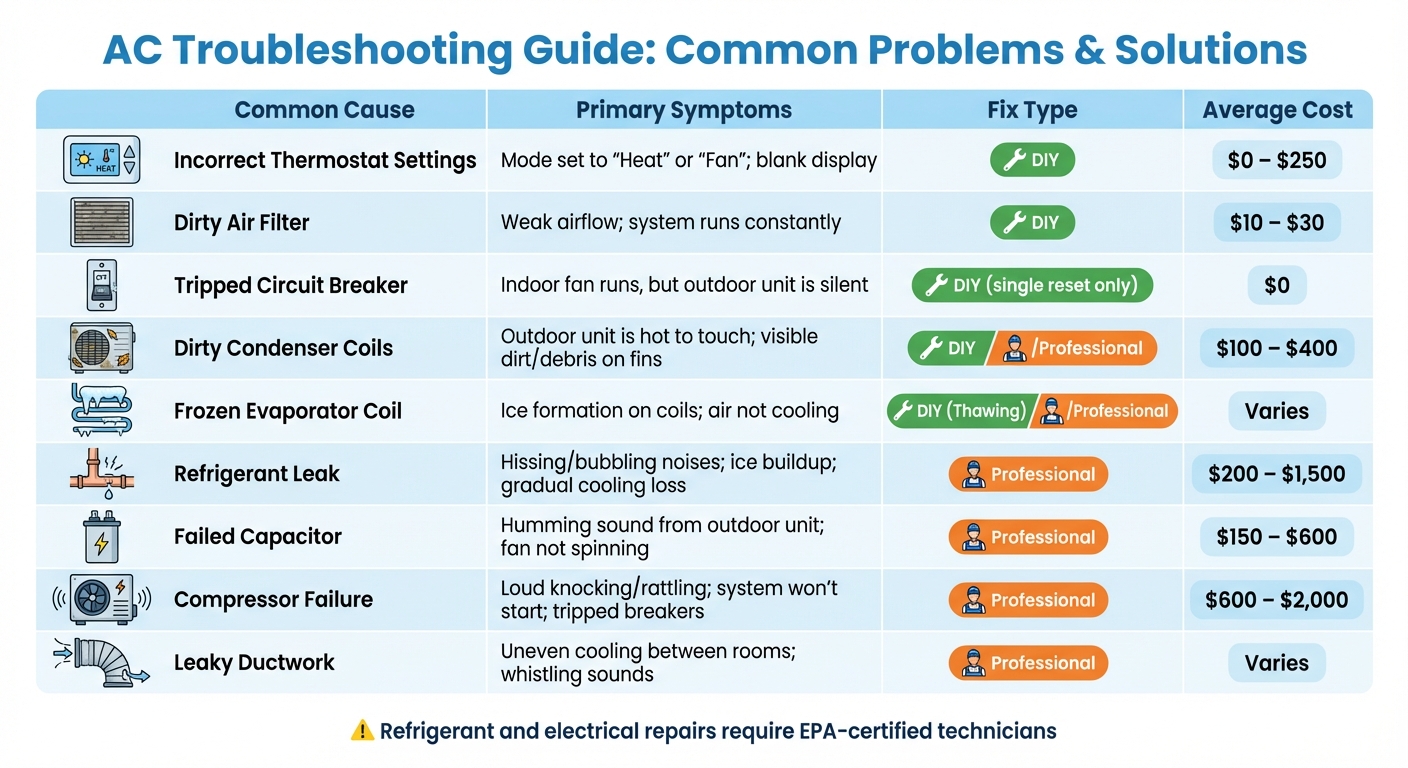
AC Troubleshooting Guide: Common Problems, Symptoms, and Repair Costs
Here’s a quick reference guide summarizing the most common AC problems, their symptoms, and potential solutions.
Table: Common AC Problems and Solutions
| Common Cause | Primary Symptoms | Fix Type | Average Cost |
|---|---|---|---|
| Incorrect Thermostat Settings | Mode set to "Heat" or "Fan"; blank display | DIY | $0 – $250 |
| Dirty Air Filter | Weak airflow; system runs constantly | DIY | $10 – $30 |
| Tripped Circuit Breaker | Indoor fan runs, but outdoor unit is silent | DIY (single reset only) | $0 |
| Dirty Condenser Coils | Outdoor unit is hot to touch; visible dirt/debris on fins | DIY/Professional | $100 – $400 |
| Frozen Evaporator Coil | Ice formation on coils; air not cooling | DIY (Thawing) / Professional | Varies |
| Refrigerant Leak | Hissing/bubbling noises; ice buildup; gradual cooling loss | Professional | $200 – $1,500 |
| Failed Capacitor | Humming sound from outdoor unit; fan not spinning | Professional | $150 – $600 |
| Compressor Failure | Loud knocking/rattling; system won't start; tripped breakers | Professional | $600 – $2,000 |
| Leaky Ductwork | Uneven cooling between rooms; whistling sounds | Professional | Varies |
For detailed instructions on each issue, refer to the earlier sections. This table is a handy starting point to identify problems and decide whether to attempt a DIY fix or call in a professional.
Important Notes:
-
Refrigerant repairs must always be handled by an EPA-certified technician. As Rene Langer, Senior Comfort Specialist at PICKHVAC, explains:
"Federal laws bar the unlicensed persons to handle refrigerant because of environmental and safety reasons".
- Electrical work beyond a basic breaker reset and any internal mechanical repairs should also be left to professionals to ensure safety.
While simpler tasks like replacing air filters or clearing debris can be done by homeowners, more complex issues such as refrigerant leaks or compressor failures require expert attention. Always prioritize safety and professional expertise for challenging repairs.
Conclusion
This guide covered straightforward maintenance tips to help restore your AC's cooling performance. If your AC is blowing warm air, simple steps like checking the thermostat, replacing a clogged air filter, or clearing debris from the outdoor unit can often solve the issue without much expense.
That said, not all problems are easy to fix. If you've already confirmed the thermostat is set correctly, replaced the filter, and cleaned the outdoor unit but still experience warm air, it’s time to bring in a professional. As HomeAlliance explains, "AC repairs can be complex, and it's often best to seek professional assistance to ensure the problem is resolved correctly and to prevent further damage to your system".
Taking care of these issues quickly can prevent more serious damage. Routine maintenance is key to avoiding many of these problems altogether. Scheduling an annual tune-up before summer hits can help catch minor issues like dirty coils or low refrigerant levels before they turn into costly repairs. Regularly replacing filters (every 1–3 months) and keeping the outdoor unit clear of debris will also help your system last longer and keep energy costs in check.
For those in Pasco, Pinellas, and Hernando counties, West Florida Air offers 24/7 emergency repairs. Whether you need a quick inspection or a major repair, their veteran-owned team provides same-day service. They also offer flexible financing options, including plans from 12 to 60 months and 0% APR for qualified buyers.
Stay proactive with maintenance, address problems early, and don’t hesitate to call for expert help when needed. Your comfort depends on it.
FAQs
Why does my AC blow warm air only at certain times?
Your AC might blow warm air on and off due to a few common issues, such as a thermostat set incorrectly, low refrigerant levels, or trouble with the compressor or condenser. For instance, if the thermostat isn’t set properly or the refrigerant levels are unstable, the cooling can become inconsistent. Start by inspecting these components, but if the problem continues, it’s a good idea to reach out to a professional HVAC technician for help.
What’s the quickest way to tell if my outdoor unit is the problem?
To figure out if your outdoor unit might be the problem, take a moment to see if it’s functioning as it should. Listen for a gentle hum and check if the fan blades are spinning. If you don’t hear any sound or notice the fan isn’t moving, the outdoor unit could be malfunctioning. This quick check can help determine if it’s the reason warm air is coming from your vents.
How can I tell if warm air is from a refrigerant leak or just low airflow?
If you're experiencing warm air due to low airflow, the likely culprits are a clogged air filter or blocked vents. Swapping out the filter or removing any obstructions from the vents can often resolve the issue.
On the other hand, if a refrigerant leak is to blame, you might notice reduced cooling performance, hissing noises, or even ice forming on the coils. Since this impacts the system's ability to absorb heat, it's a problem that usually calls for professional attention.