

How to Troubleshoot Zoning System Thermostats
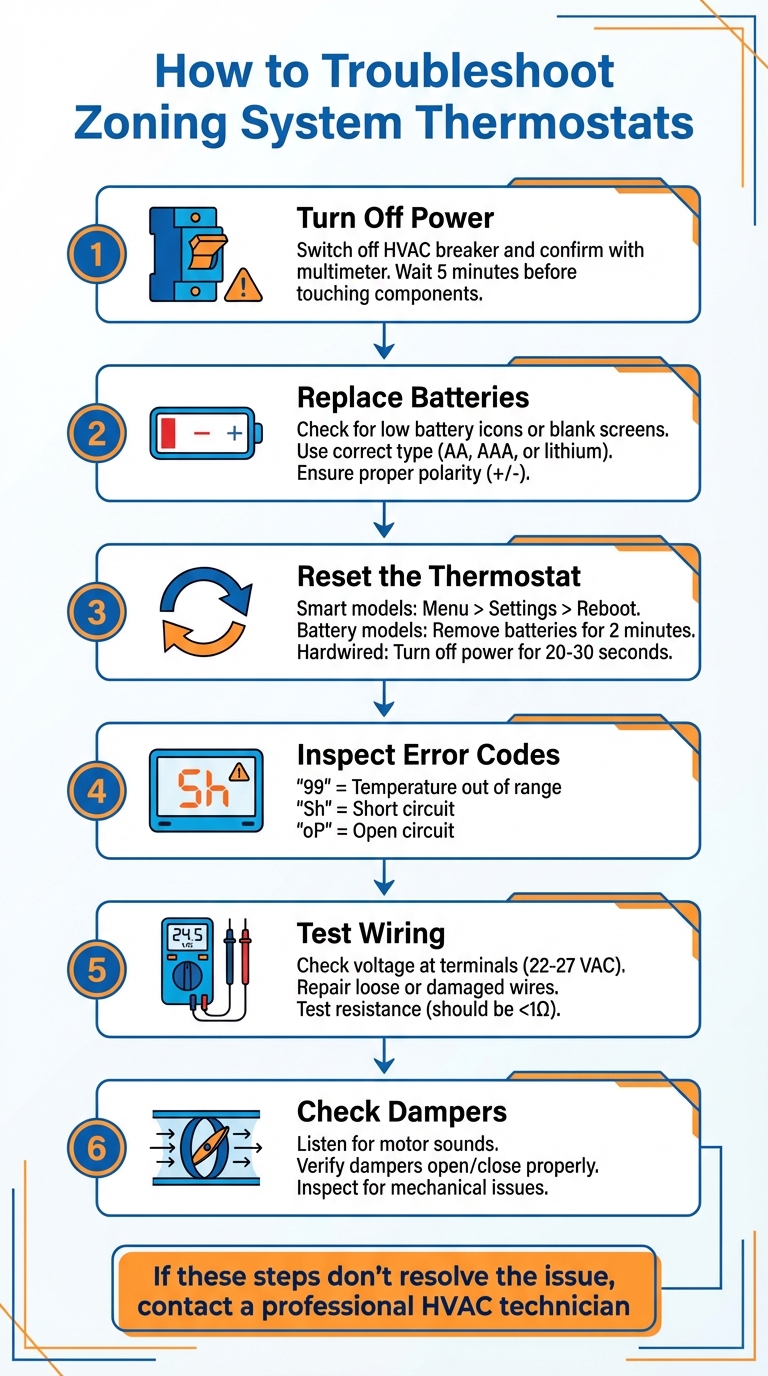
If your zoning system thermostat isn’t working, start by checking the basics. Issues like dead batteries, inaccurate temperature readings, or unresponsive controls are common. Here's how to troubleshoot:
- Turn Off Power: Switch off the HVAC breaker and confirm power is off with a multimeter.
- Replace Batteries: Check for low battery icons or blank screens. Replace with the correct type (AA, AAA, or lithium) and ensure proper polarity.
- Reset the Thermostat: For smart models, use the reset/reboot option in the menu. For others, turn off power or remove batteries for a few minutes.
- Inspect Error Codes: Look for messages like "99" (temperature out of range) or "Sh" (short circuit) to identify specific issues.
- Test Wiring: Use a multimeter to check voltage at terminals. Loose or damaged wires may need repair.
- Check Dampers: Ensure dampers open and close properly. Listen for motor sounds or inspect for mechanical issues.
If these steps don’t resolve the problem, advanced diagnostics may be required, such as testing the zone panel or damper functionality. For complex issues, contact a professional HVAC technician to avoid further damage.
6-Step Zoning System Thermostat Troubleshooting Guide
Part 1 Zoning System Diagnostics
sbb-itb-ab7d5a1
Safety Steps Before You Start
Before diving into thermostat repairs, it’s important to take a few safety precautions. Handling HVAC electrical components can be risky - there’s potential for shock, short circuits, or even damage to your equipment. This is because zoning systems involve live thermostats, transformers, dampers, and control panels.
Turn Off Power at the Breaker
First, locate your HVAC system’s circuit breaker in the electrical panel and turn it off. This step ensures there’s no electrical current flowing to the zone control board or thermostats. Clearly label this breaker so you can easily find it for future maintenance tasks. Additionally, switch off any dedicated power controls near the air handler or condenser.
Once the breaker is off, wait at least five minutes before touching any components. This gives the system enough time to discharge any leftover electrical energy.
Confirm Power is Off
Next, use a voltmeter or multimeter to double-check that the power is completely off. Measure the voltage at the zone panel and thermostat terminals. Joe Ramunni, Technical Sales Manager at Arzel Zoning Technology, Inc., offers this guidance:
Using a voltmeter, verify that there is panel input control voltage. The voltage reading should be between 10% of 24 VAC (22 to 27 VAC).
If your meter reads zero volts, you’re good to go. However, if any voltage is detected, revisit the breaker and switches to ensure they’re properly turned off.
Don't Adjust Dampers Without Proper Tools
Avoid the temptation to manually force dampers open or closed. Instead, inspect for mechanical issues using the correct electrical testing tools. If you need to test damper functionality, rely on the zone panel controls rather than manipulating parts by hand. RetroZone emphasizes this important safety note:
NEVER leave jumpers in place as the equipment will not turn off, leading to potentially dangerous temperatures. Always disconnect 24vac power to zone board before applying jumpers.
Finally, take photos of all wiring connections before disconnecting anything. This simple step can save you a lot of time and confusion during reassembly.
Simple Thermostat Checks
Once you've confirmed the power is safely off, it's time to dive into some straightforward troubleshooting steps. These basic checks can address many common thermostat issues without needing technical expertise. They’re often enough to get your zoning system working smoothly again.
Check and Replace Batteries
Most programmable thermostats will alert you when their batteries are running low, often by flashing a battery icon or displaying a "Low Batt" message about a month or two before they fail. Signs like a dim display, sluggish response, or an HVAC system that stops reacting to temperature adjustments might indicate that the batteries are nearing the end of their life. If the screen goes completely blank, it’s a clear sign that the batteries are dead and need immediate replacement. Even hardwired thermostats include backup batteries to retain programmed settings during power outages.
According to ARS/Rescue Rooter:
Almost all programmable models have a low battery indicator that appears, usually around a month or two before the battery runs out entirely.
To replace the batteries, remove the thermostat housing from the wall plate following your model's instructions. Pay close attention to the polarity markings in the battery compartment, ensuring the positive (+) and negative (-) ends are aligned correctly. Most thermostats use AA or AAA alkaline batteries, though some may require 3V lithium button cells or 9-volt batteries. Battery life typically ranges from eight months to a year, though premium batteries can last up to five years.
A good rule of thumb is to replace the batteries annually on a memorable date, like the first day of fall, to avoid unexpected failures. After replacing the batteries, double-check the thermostat's temperature reading against a separate thermometer. Occasionally, fresh batteries can temporarily affect calibration.
Once the batteries are replaced, reset the thermostat to clear any software glitches and restore communication with the zone panel.
Reset and Reconfigure the Thermostat
If replacing the batteries doesn’t fix the issue, the next step is to reset the thermostat. A reset can resolve problems like frozen screens, unresponsive buttons, or other erratic behavior by clearing software glitches and reestablishing a connection with the zone control panel.
For smart thermostats, navigate to Menu > Settings > Reboot and confirm. This process usually takes a few minutes. For battery-powered models, remove the unit and the batteries for two minutes. For hardwired models, turn off the HVAC system at both the thermostat and the circuit breaker for 20–30 seconds.
After resetting, reconfigure the thermostat settings. Ensure the system mode - Heat, Cool, or Auto - is correct. If you have a heat pump system, make sure it’s not stuck in "Emergency Heat" or "Defrost" mode. To check if the thermostat is communicating with the zone panel, adjust the temperature setting at least 5°F higher (for heating) or lower (for cooling) than the current room temperature, and listen for the system to activate.
If your thermostat displays a padlock icon and doesn’t respond to button presses, it’s locked. On many models, you can unlock it by holding the Time (+) and (-) keys simultaneously.
Check Display and Error Messages
If the thermostat continues to act up after replacing the batteries and resetting, take a closer look at the display for error codes. These codes can help pinpoint issues like temperature sensor problems, wiring faults, or communication errors with the zone panel.
For example, systems with communicating sensors, such as the Trane BAYSENS119, might display messages like "Sh" (shorted remote sensor), "oP" (open circuit at the sensor), or "COOL FAIL" (communication error with the zone panel), which usually indicate sensor or wiring issues. These errors often stem from wiring problems at the sensor terminals or incorrect settings in the options menu.
If you see messages like "System Failure" or "Check Filter" accompanied by a buzzer, use the "Erase" or "Reset" key to clear the alert. For hardwired thermostats with unresponsive displays, the problem could be a lack of 24V power from the zone control panel. This can be confirmed in the next section through electrical testing.
| Symptom | Likely Cause | Quick Fix |
|---|---|---|
| Flashing battery icon or "Low Batt" text | Low battery (1-2 months remaining) | Replace batteries soon |
| Fading display or slow response | Critically low battery | Replace batteries immediately |
| Blank screen / HVAC won't trigger | Dead battery or tripped breaker | Replace batteries and check circuit breaker |
| Loss of programmed settings | Dead/missing backup battery | Replace batteries and reconfigure schedule |
| Padlock icon displayed | Keypad locked | Hold Time (+) and (-) keys to unlock |
If none of these steps resolve the issue, more advanced electrical diagnostics may be required.
Electrical Testing and Diagnostics
When basic troubleshooting doesn’t solve the problem, it’s time to dig deeper by testing the electrical connections between your thermostat and zone panel. You’ll need a True RMS multimeter to measure voltage and resistance, along with a screwdriver, jumper wires or alligator clips, and a smartphone to snap photos of the wiring connections for reference. These tests can uncover issues that might not be obvious during initial troubleshooting.
As JR from Arzel Tech Support explains:
Testing resistance confirms circuit integrity but may require disconnecting one side so we're only testing the contact point, not the entire circuit.
The control voltage should fall between 22–27 VAC (with 24 VAC being standard). If your readings are outside of this range or show 0 VAC, the issue might involve the transformer, a blown fuse, or a tripped safety switch like a condensate overflow sensor.
Check Wiring and Connections
Start by measuring the voltage between the R (hot) and C (common) terminals at the thermostat. A proper reading will show around 24 VAC. If the thermostat registers 24 VAC at R–C but fails at the output terminals, inspect the wiring at both the thermostat and the zone panel for loose or corroded connections.
Next, verify that the thermostat is signaling the zone panel. With the thermostat calling for heat, measure the voltage between C and W (heating terminal). It should read 24 VAC when the contact is closed. For cooling, perform the same test between C and Y. If R–C measures 24 VAC but the functional terminals show 0 VAC, the issue may be upstream. Check the transformer, zone panel fuses, or safety switches that could be interrupting power.
To determine if the problem lies with the thermostat or the wiring, remove the thermostat from its wall plate and jumper R to W (for heat) or R to G (for fan) directly at the subbase terminals. Joe Ramunni, Technical Sales Manager at Arzel Zoning Technology, advises:
If you jumper out the thermostat at the subbase and the zone works, then you have a thermostat problem. If the zone doesn't work, there's a wiring problem.
For a more detailed diagnosis, test the resistance (measured in ohms) instead of just continuity. A closed contact should read below 1Ω. If the thermostat is calling for heat but the resistance between R and W exceeds 1Ω, the thermostat may be defective and require replacement. Additionally, a "split voltage" reading - like 6 VAC on one side and 18 VAC on the other - suggests burned or pitted contacts.
Test Zone Panel Inputs
If the thermostat and wiring appear fine, shift your attention to the zone panel. Always disconnect the 24 VAC power supply to the zone board before applying jumpers, and reconnect power only after the jumpers are securely in place.
To test the zone panel, disconnect the thermostat wires from its terminals and jumper R to G directly on the board. If the blower fan activates, the fan relay is functioning. Similarly, jumper R to Y to test the cooling compressor, but wait at least five minutes between tests to account for the compressor’s built-in time delays.
To check the heating system, jumper R to W on the zone panel. If the furnace or heat pump starts, the heating relay is operational. Many modern zone panels have LED indicators that light up when a zone calls for equipment. If the LED is on but the equipment doesn’t respond, the output relays on the board may need further testing or replacement.
Never leave jumpers in place after testing. RetroZone Inc. warns:
NEVER leave jumpers in place as the equipment will not turn off, leading to potentially dangerous temperatures.
If jumpering the zone panel activates the equipment but the thermostat doesn’t, the issue lies in the field wiring between the thermostat and the zone panel. Inspect the wiring for damage, particularly in areas like attics or crawlspaces where cables might have been accidentally cut or disconnected.
Here’s a quick reference table for expected voltage and jumper test results at each terminal:
| Terminal | Function | Expected Voltage (to C) | Jumper Test (from R) |
|---|---|---|---|
| R | 24VAC Hot | 24 VAC | N/A |
| C | 24VAC Common | 0 VAC | N/A |
| W/W1 | Heating | 24 VAC (when calling) | Activates Heat/Furnace |
| Y/Y1 | Cooling | 24 VAC (when calling) | Activates Compressor |
| G | Fan | 24 VAC (when calling) | Activates Blower Fan |
Checking Dampers and Airflow
Once you've confirmed that the electrical components are functioning properly, it's time to ensure that your dampers are working as they should. Even if the thermostat and zone panel check out, malfunctioning dampers can throw the entire system off balance. Dampers play a crucial role in controlling airflow to specific zones. If they fail, you might notice some rooms are overly conditioned (a sign the damper is stuck open) or completely lacking airflow (indicating a damper stuck closed). Greg Smith, President of Quality Heating and Sheet Metal Company, explains:
If a damper is stuck closed it could cause an air conditioning condenser to ice up, or a furnace to overheat and shut down on a limit control.
Verify Damper Operation
Start by checking whether the dampers respond to signals from the thermostat. When you adjust the thermostat to call for heating or cooling, listen for the sound of damper motors near the ductwork. If your dampers have LED indicators, use them to confirm their positions.
When no thermostat is calling for heating or cooling, all dampers should remain open:
Both Dampers should be open when no stat is calling. Opposite zone damper should close when jumpering zones.
If you can access the dampers in your attic or crawlspace, inspect them visually. Look for issues like stripped gears, loose linkages, or motor problems that could prevent the blades from moving, even if the damper receives a signal.
Test Airflow and System Response
To ensure the dampers are operating correctly, perform a single-zone test. Activate one zone by calling for heating or cooling, and then check the airflow at each register. Air should only flow in the active zone. If you notice air coming from registers in zones that are turned off, those dampers might be stuck open or leaking.
While running this test, also confirm that your HVAC equipment - whether it's a furnace, heat pump, or air conditioner - is functioning as expected. Joe Ramunni, Technical Sales Manager at Arzel Zoning Technology, Inc., emphasizes:
The first step in a situation where not enough or no air is being introduced into the living space is to make sure the standard mechanical equipment is working properly.
If you hear excessive air noise when only a small zone is active, it could mean the bypass damper needs adjustment. The bypass damper should only open when air pressure becomes too high. For cooling systems, check the temperature difference between the return air vent and the nearest supply vent. A difference of 15–20°F indicates that the air conditioner is cooling effectively.
When to Contact West Florida Air Conditioning & Heating Inc.
Sometimes, even after trying basic troubleshooting steps, you might still face issues with your HVAC system. While simple fixes like replacing batteries or checking your breaker can solve many thermostat problems, more complex issues - like wiring troubles, zone panel failures, or equipment malfunctions - can be risky to handle without proper tools and training. If these steps don’t get your system back on track, it’s time to call in the experts.
Reach out to West Florida Air Conditioning & Heating Inc. immediately if you notice burning smells, strange sounds like hissing or banging, or water leaks. These are signs of serious problems that need urgent attention. Additionally, if your system is rapidly turning on and off, or if there’s ice forming on the condenser or evaporator coils, it could indicate compressor issues that require professional care. For emergencies, especially during Florida’s intense heat, West Florida Air offers 24/7 emergency repair services to keep your home comfortable and prevent further damage.
When it comes to diagnosing internal circuitry or testing voltage, specialized tools are a must. If your dampers are stuck behind drywall or actuators have failed mechanically, professionals have the expertise and equipment to locate and fix these components safely. They can also assist with setting up smart thermostats, ensuring your WiFi-enabled devices work seamlessly with your system for easy remote control and energy monitoring.
For residents in Pasco, Pinellas, and Hernando counties, West Florida Air Conditioning & Heating Inc. is a trusted name for zoning diagnostics and repairs. Before calling, jot down any error messages from your thermostat or control panel. If you’ve had recent work done - like cable installation or duct cleaning - mention it, as it might have impacted your system. And don’t forget: Florida’s climate demands regular maintenance. Schedule AC tune-ups twice a year - once in spring and once in fall - to keep your system running smoothly through the heat.
Conclusion
Fixing issues with your zoning system thermostat often starts with simple steps: check the breaker, replace the batteries, and reset the system. If those don’t work, take a closer look at the wiring, inspect the zone panel for error codes, and ensure the dampers are functioning as they should. To confirm your cooling system is working correctly, look for a 15–20°F temperature difference between the return and supply vents. Once these basic problems are addressed, focusing on prevention becomes key.
Regular upkeep is the best way to avoid future headaches. Change your air filters every 60–90 days and schedule tune-ups twice a year - in the spring and fall - to keep your system running smoothly. Staying ahead of potential issues can save you from costly repairs down the line.
FAQs
What should I do if my zoning system thermostat isn’t working after troubleshooting?
If your zoning system thermostat remains unresponsive after trying basic troubleshooting steps - like replacing the batteries, resetting the device, or double-checking the wiring - it’s probably time to bring in a professional. An experienced HVAC technician, such as the team at West Florida Air Conditioning & Heating Inc., can thoroughly examine the thermostat, control panel, and dampers to pinpoint and fix the problem.
Trying to tackle more complex repairs on your own could make things worse. Trusting a professional ensures your system gets repaired correctly and operates efficiently again.
How do I safely check the wiring on my zoning system thermostat?
To safely test the wiring on your zoning system thermostat, start by turning off the power to your HVAC system at the circuit breaker. This step is crucial to avoid electric shock or accidentally activating the system. Once the power is off, remove the thermostat's front cover and either take a photo or jot down the wire colors and their corresponding terminals (like R, W, Y). This will help you reconnect everything correctly later.
Now, using a small, insulated wire, you can test the heating and cooling circuits. For the heating circuit, briefly connect the R (power) terminal to the W (heat) terminal. If the furnace or heat pump turns on, the heating circuit is in working order. Next, test the cooling circuit by connecting R to Y (cool). If the air conditioner activates, the cooling circuit is functioning properly. Make sure to remove all jumper wires immediately after testing to avoid damaging your equipment.
Once testing is complete, restore power, reattach the thermostat cover, and check the system by setting it to heating and cooling modes. If the system doesn’t respond as expected, the issue could be with the thermostat, the wiring, or the HVAC equipment itself. For a thorough diagnosis and professional repairs, reach out to West Florida Air Conditioning & Heating Inc. Their experienced team can help ensure your zoning system runs smoothly and safely.
When should I call a professional for zoning system thermostat problems?
If your zoning system thermostat is acting up, there are a few telltale signs that it’s time to bring in a professional. For instance, a blank screen, controls that don’t respond, or a thermostat that won’t adjust the temperature could signal power issues, dead batteries, or even wiring problems. If your HVAC system refuses to turn on or runs endlessly without shutting off, the thermostat might be miscalibrated or have a faulty control board.
You might also notice temperature mismatches - when the thermostat’s reading doesn’t reflect the actual room temperature - or experience frequent short-cycling. Error messages on a smart thermostat are another red flag. These problems often stem from sensor malfunctions, aging components, or communication breakdowns with zone dampers.
When these issues arise, you can count on West Florida Air Conditioning & Heating Inc. to get things back on track. Serving Pasco, Pinellas, and Hernando counties, their experienced team is ready to diagnose and fix your thermostat troubles, ensuring your zoning system keeps your home consistently comfortable.